> ## Documentation Index
> Fetch the complete documentation index at: https://docs.turbostack.io/llms.txt
> Use this file to discover all available pages before exploring further.
# Payments with Stripe
Let's create a Stripe Checkout to set up a subscription and let our webhook handle the logic to provide access to the user.
TurboStack supports both one-time payments and subscriptions. We currently supports stripe payment flow, but we have plans to include paddle and lemon squeezy for our integrations.
## Getting Started with Stripe
We will need a Stripe account, you can [create your account here](https://stripe.com/login).
After creating your account, you need to activate it for receiving payments (boring stuff detected).
When you're ready for receiving payments, go to the ["Developers Page"](https://dashboard.stripe.com/workbench/overview) and copy your keys and add them to
`STRIPE_SECRET_KEY` and `NEXT_PUBLIC_STRIPE_PB_KEY` in your `.env.local` file.
You're ready to proceed with webhooks for now.
## Configuring Webhooks
When going to production, you will need the webhook URL and the events you want to listen in Stripe.
The webhook path configured on turbostack is `/api/webhook/stripe`. If your app are (or are going to be) hosted on `myapp.com` domain, then you can enter `https://app.myapp.com/api/webhook/stripe` at "Endpoint URL" input.
We need to listen to the following events to make things works properly:
* `checkout.session.completed`
* `customer.subscription.updated`
* `customer.subscription.deleted`
* `customer.session.expired` (optional, you may need this if you want to send an email for an abandoned checkout flow)
If you're using one-time payments, add the following:
* `checkout.session.async_payment_succeeded`
* `customer.session.async_payment_failed`
You can add new events in your webhook, but you'll also need to handle then in your `/apps/web/app/api/webhook/stripe/route.ts` file
```ts theme={null}
switch (event.type) {
case 'checkout.session.completed':
// The user paid successfully and the subscription was created (if any exists)
// Here you should provide access to your customer and send him an email.
// You can use UpgradeEmail.
await checkoutSessionCompleted(event);
break;
case 'checkout.session.expired':
// The user didn't completed the transaction
// You can optionally send an email to track the reasons behind it.
await checkoutSessionExpired(event);
break;
case 'customer.subscription.updated':
// The user updated it subscription for some reason, upgraded the plan, changed the quota, his payment method, etc.
// You should check if something changed between your database and Stripe.
await customerSubscriptionUpdated(event);
break;
case 'customer.subscription.deleted':
// The subscription was canceled.
// You should revoke the access.
await customerSubscriptionDeleted(event);
break;
case 'invoice.paid':
// A payment was made, triggered from a recurring subscription or a order payment.
// You should provide acess to your customer and or emit a custom invoice.
await invoicePaid(event);
break;
case 'invoice.payment_failed':
// A payment failed, triggered from a recurring subscription or a order payment.
// You should:
// Revoke Access based on some criteria (3 failed attemps)
// Send the user an email to update his payment method and wait the 'customer.subscription.deleted' event.
await invoicePaymentFailed(event);
break;
}
```
## Creating your Plans
Go to ["Product Catalog Page"](https://dashboard.stripe.com/products?active=true) and click the "Create Product" button.
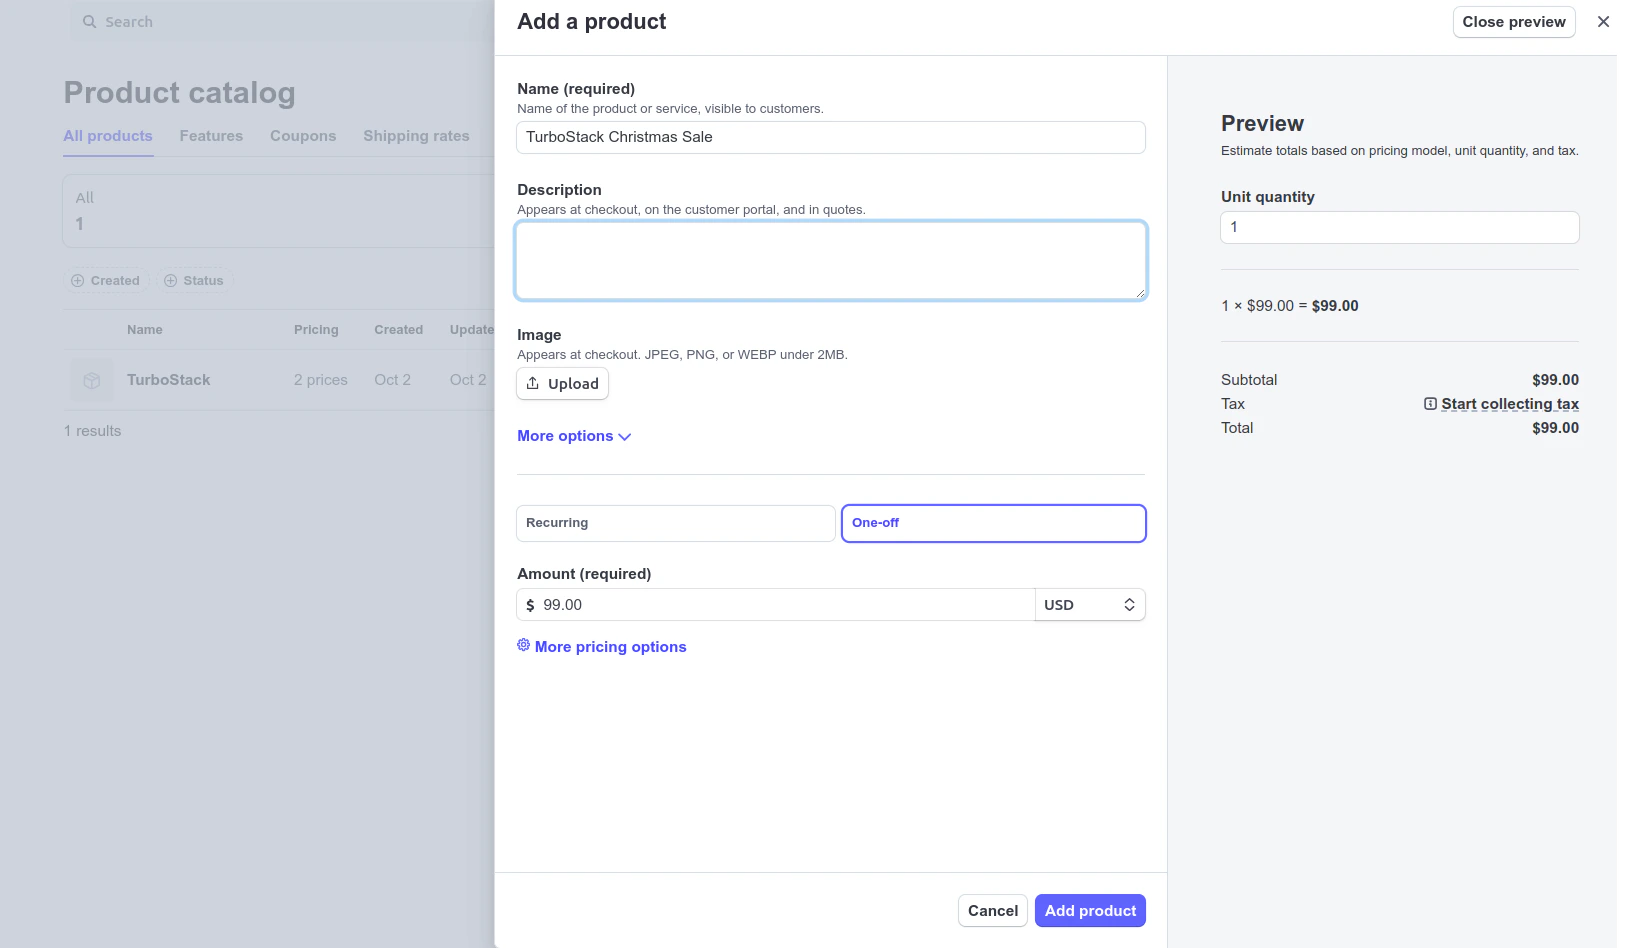 Set a name, a billing mode (recurring or one-off), a monthly price, an annual price or anything more needed to fit your business model. Then click "Save Product".
In the pricing section, copy the product price ID starting with `price_` and add it to your Pro plan in your `packages/utils/src/constants/pricing.ts` file.
Repeat this process to all your plans and you'll be ready to go.
If you're doing this on **Test Mode**, you'll need to repeat this process when going production, because the price IDs and product data are not global.
## Configuring Billing Portal
Stripe requires you to set up the ["Customer Portal"](https://dashboard.stripe.com/settings/billing/portal), so your users can manage their billing information and get their invoices from there.
Set a name, a billing mode (recurring or one-off), a monthly price, an annual price or anything more needed to fit your business model. Then click "Save Product".
In the pricing section, copy the product price ID starting with `price_` and add it to your Pro plan in your `packages/utils/src/constants/pricing.ts` file.
Repeat this process to all your plans and you'll be ready to go.
If you're doing this on **Test Mode**, you'll need to repeat this process when going production, because the price IDs and product data are not global.
## Configuring Billing Portal
Stripe requires you to set up the ["Customer Portal"](https://dashboard.stripe.com/settings/billing/portal), so your users can manage their billing information and get their invoices from there.
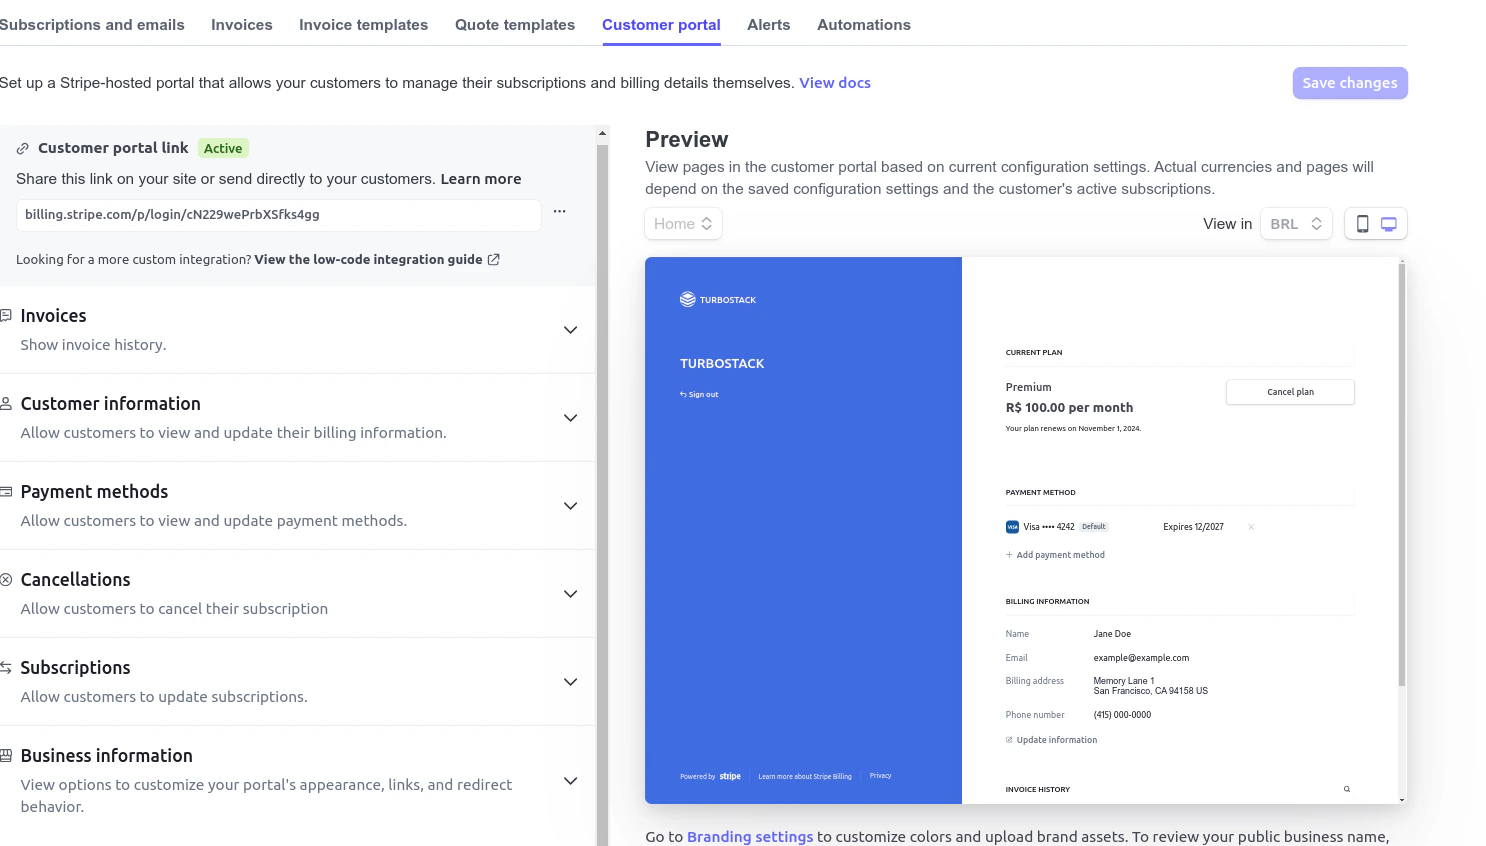 1. Please make sure to enable the setting that lets users switch plans
2. Configure the behavior of the cancellation according to your needs
## Testing your Stripe integration
You can set up a webhook integration locally, to do this, you need to enable the "Test Mode" switch at the top of your toolbar at Stripe.
After that, install the ["Stripe CLI"](https://docs.stripe.com/stripe-cli) which will help you setup a tunnel that forwards requests from Stripe to your application.
Login into the Stripe CLI running the following command:
```bash theme={null}
stripe login
```
After that, start the tunnel
```bash theme={null}
stripe listen --forward-to localhost:3000/api/webhook/stripe
```
Change the generated webhook signing secret to your `STRIPE_WEBHOOK_SECRET` in your `.env.local` file.
Follow the instructions at [Stripe Documentation](https://docs.stripe.com/testing) to guarantee that your integration is working properly.
1. Please make sure to enable the setting that lets users switch plans
2. Configure the behavior of the cancellation according to your needs
## Testing your Stripe integration
You can set up a webhook integration locally, to do this, you need to enable the "Test Mode" switch at the top of your toolbar at Stripe.
After that, install the ["Stripe CLI"](https://docs.stripe.com/stripe-cli) which will help you setup a tunnel that forwards requests from Stripe to your application.
Login into the Stripe CLI running the following command:
```bash theme={null}
stripe login
```
After that, start the tunnel
```bash theme={null}
stripe listen --forward-to localhost:3000/api/webhook/stripe
```
Change the generated webhook signing secret to your `STRIPE_WEBHOOK_SECRET` in your `.env.local` file.
Follow the instructions at [Stripe Documentation](https://docs.stripe.com/testing) to guarantee that your integration is working properly.