> ## Documentation Index
> Fetch the complete documentation index at: https://docs.turbostack.io/llms.txt
> Use this file to discover all available pages before exploring further.
# Deploy your application
> At the end of this tutorial, you'll have a brand new productive application!
Hey! Congratulations on your brand new application 👏, i'll gladly help you making it online.
We strongly recommend vercel for deploying your project. You can also go to a self-hosted strategy, but will need a lot of work to make things works properly.
## Step by step
1. Login into your [Vercel Account](https://vercel.com) with your preferred authentication method.
2. Click the "New Project" button.
3. Select your TurboStack project.
4. Select `/apps/web` as root directory of your project.
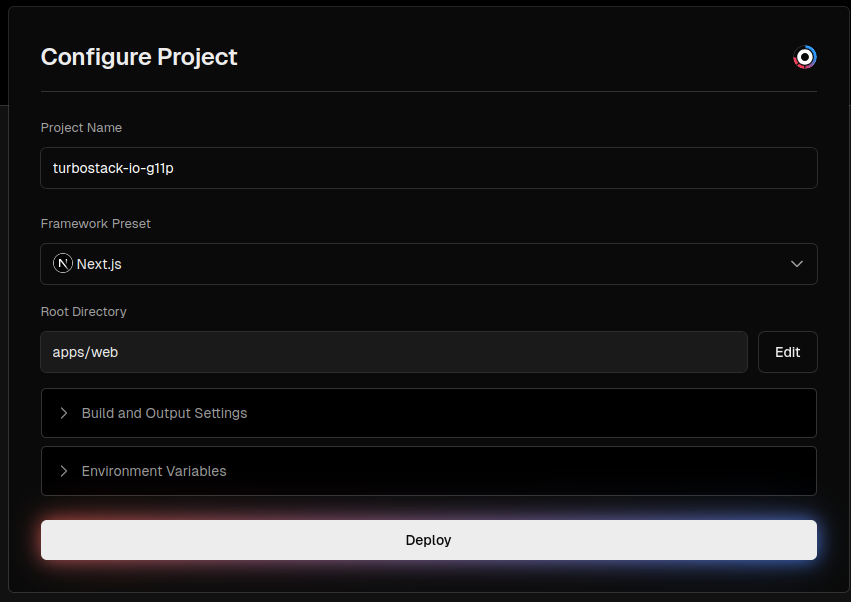 5. Set up your environment variables.
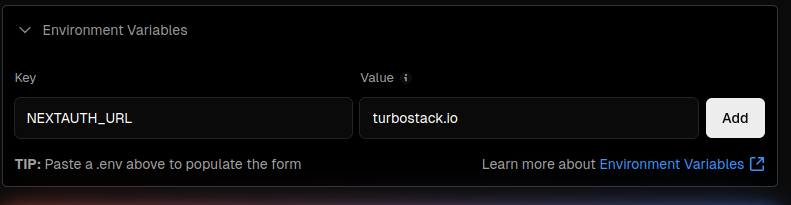 Here's a table with all the variables you can set (you can check your `.env.example` and `.env.local` either):
| Key | Value |
| :-------------------------------- | :--------------------------------------------------------------------------------- |
| **NEXTAUTH\_URL** | Your productive app subdomain (e.g [https://app.myapp.com](https://app.myapp.com)) |
| **NEXTAUTH\_SECRET** | Your NextAuth secret (add a secret with at least 32 characters long) |
| **NEXT\_PUBLIC\_APP\_DOMAIN** | Your productive app subdomain (e.g [https://app.myapp.com](https://app.myapp.com)) |
| **DATABASE\_URL** | Your productive database url |
| **RESEND\_API\_KEY** | Your Resend API Key |
| **RESEND\_AUDIENCE\_ID** | Your Resend Audience ID to Collect Emails |
| **GOOGLE\_CLIENT\_ID** | Your Google OAuth Client ID |
| **GOOGLE\_CLIENT\_SECRET** | Your Google OAuth Client Secret |
| **NEXT\_PUBLIC\_STRIPE\_PB\_KEY** | Your Stripe Public Key |
| **STRIPE\_SECRET\_KEY** | Your Stripe Secret Key |
| **STRIPE\_WEBHOOK\_SECRET** | Your Stripe Webhook Signing Secret |
| **UPSTASH\_REDIS\_REST\_URL** | Your Upstash Redis Database URL |
| **UPSTASH\_REDIS\_REST\_TOKEN** | Your Upstash Redis Authentication Token |
6. Click "Deploy" button and wait until the magic happens!
## Add your Domain
1. Go to Vercel's ["Dashboard Page"](https://vercel.com) and pick the project you created before.
2. Navigate to **Settings > Domains** page.
3. From **Domains** page, create two domains, one for your marketing page, and one for your application page. If your host are `myapp.com`, then create `myapp.com` and `app.myapp.com`.
Here's a table with all the variables you can set (you can check your `.env.example` and `.env.local` either):
| Key | Value |
| :-------------------------------- | :--------------------------------------------------------------------------------- |
| **NEXTAUTH\_URL** | Your productive app subdomain (e.g [https://app.myapp.com](https://app.myapp.com)) |
| **NEXTAUTH\_SECRET** | Your NextAuth secret (add a secret with at least 32 characters long) |
| **NEXT\_PUBLIC\_APP\_DOMAIN** | Your productive app subdomain (e.g [https://app.myapp.com](https://app.myapp.com)) |
| **DATABASE\_URL** | Your productive database url |
| **RESEND\_API\_KEY** | Your Resend API Key |
| **RESEND\_AUDIENCE\_ID** | Your Resend Audience ID to Collect Emails |
| **GOOGLE\_CLIENT\_ID** | Your Google OAuth Client ID |
| **GOOGLE\_CLIENT\_SECRET** | Your Google OAuth Client Secret |
| **NEXT\_PUBLIC\_STRIPE\_PB\_KEY** | Your Stripe Public Key |
| **STRIPE\_SECRET\_KEY** | Your Stripe Secret Key |
| **STRIPE\_WEBHOOK\_SECRET** | Your Stripe Webhook Signing Secret |
| **UPSTASH\_REDIS\_REST\_URL** | Your Upstash Redis Database URL |
| **UPSTASH\_REDIS\_REST\_TOKEN** | Your Upstash Redis Authentication Token |
6. Click "Deploy" button and wait until the magic happens!
## Add your Domain
1. Go to Vercel's ["Dashboard Page"](https://vercel.com) and pick the project you created before.
2. Navigate to **Settings > Domains** page.
3. From **Domains** page, create two domains, one for your marketing page, and one for your application page. If your host are `myapp.com`, then create `myapp.com` and `app.myapp.com`.
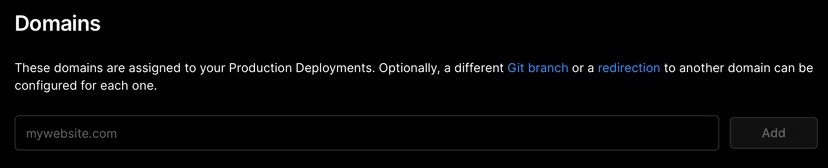 4. After that, you will have a brand new domain, but non-productive yet. You'll need to setup your DNS Records to make your Registrar points your domain to Vercel's created domain:
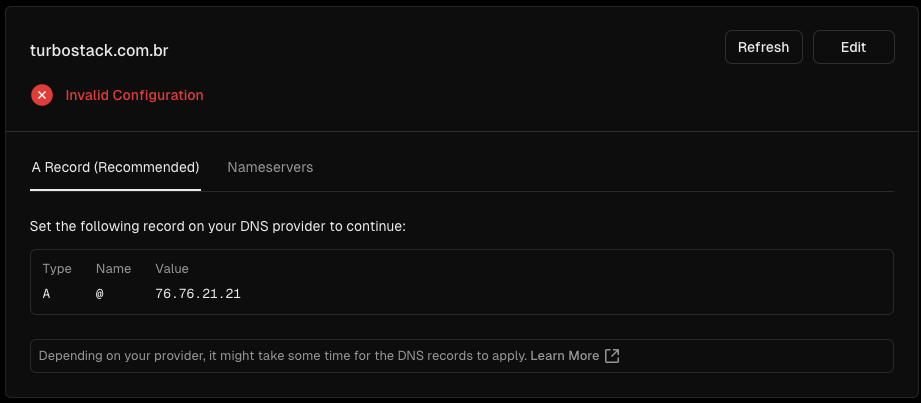 ## Configuring your DNS
1. Proceed to your domain’s DNS settings on your domain provider.
2. Create two new DNS entries, with the following values:
| Type | Name | Value |
| :---- | :--- | :-------------------- |
| A | @ | 76.76.21.21 |
| CNAME | app | cname.vercel-dns.com. |
3. If your DNS Records were properly configured, you'll notice a change in your domain's status, making it available to the internet.
## Configuring your DNS
1. Proceed to your domain’s DNS settings on your domain provider.
2. Create two new DNS entries, with the following values:
| Type | Name | Value |
| :---- | :--- | :-------------------- |
| A | @ | 76.76.21.21 |
| CNAME | app | cname.vercel-dns.com. |
3. If your DNS Records were properly configured, you'll notice a change in your domain's status, making it available to the internet.
 4. Open your brand new domain and see your page online.
## Conclusion
Now you can share with your friends and family 👏, congratulations on your brand new app!
I want to showcase your application in [TurboStack Home Page](https://turbostack.io), you can [send me an email](mailto:vitor@turbostack.io) with the subject `Showcase my app - {{APP_NAME}}`
I wish the best of luck to your new app.
Cheers! \
Vitor
4. Open your brand new domain and see your page online.
## Conclusion
Now you can share with your friends and family 👏, congratulations on your brand new app!
I want to showcase your application in [TurboStack Home Page](https://turbostack.io), you can [send me an email](mailto:vitor@turbostack.io) with the subject `Showcase my app - {{APP_NAME}}`
I wish the best of luck to your new app.
Cheers! \
Vitor